SSM-Bean的学习
Bean的配置及实例化
Bean的属性
- id
- name
- class
- scope
Bean的种类
- 构造器实例化
- 静态工厂方法实例化
- 实例工厂方法实例化
构造器实例化
Bean类
ApplicationContext.xml
1
2
3
4
5
6
7
8
9
10
| <?xml version="1.0" encoding="UTF-8"?>
<beans xmlns="http://www.springframework.org/schema/beans"
xmlns:xsi="http://www.w3.org/2001/XMLSchema-instance"
xsi:schemaLocation="http://www.springframework.org/schema/beans
http://www.springframework.org/schema/beans/spring-beans-4.3.xsd">
<bean id="Bean1" class="com.itheima.ioc.Bean1">
</bean>
</beans>
|
Bean测试
1
2
3
4
5
6
7
8
| public class InstanceTest1 {
public static void main(String[] args) {
String xmlPathString = "com/itheima/ioc/applicationContext.xml";
ApplicationContext applicationContext = new ClassPathXmlApplicationContext(xmlPathString);
Bean1 bean1 = (Bean1) applicationContext.getBean("Bean1");
System.out.println(bean1);
}
}
|
这种方法很清晰明了,就是直接通过id class 进行获取实例,最常见
静态工厂方式实例化
Bean2
BeanFactory,工厂,返回实例,注意,这里是静态方法
1
2
3
4
5
| public class BeanFactory {
public static Bean2 createInstance() {
return new Bean2();
}
}
|
配置文件,这里需要添加factory-method 就是如何获取实例的,通过BeanFactory的方法进行实例化
1
2
3
4
5
6
7
8
9
10
| <?xml version="1.0" encoding="UTF-8"?>
<beans xmlns="http://www.springframework.org/schema/beans"
xmlns:xsi="http://www.w3.org/2001/XMLSchema-instance"
xsi:schemaLocation="http://www.springframework.org/schema/beans
http://www.springframework.org/schema/beans/spring-beans-4.3.xsd">
<bean id="Bean2" class="com.itheima.static_factory.BeanFactory" factory-method="createInstance">
</bean>
</beans>
|
测试方法
1
2
3
4
5
6
7
8
9
10
| public class InstanceTest2 {
public static void main(String[] args) {
String xmlPath = "com/itheima/static_factory/applicationContext.xml";
ApplicationContext applicationContext = new ClassPathXmlApplicationContext(xmlPath);
System.out.println(applicationContext.getBean("Bean2"));
}
}
|
实例工厂方式实例化
Bean3
Bean工厂
1
2
3
4
5
6
7
8
9
| public class BeanFactory {
public BeanFactory() {
System.out.println("Bean3 create!!!");
}
public Bean3 createBean() {
return new Bean3();
}
}
|
配置文件,这里分两个bean,第一个bean就是获取一个工厂实例,构造器实例化,第二个bean就是通过这个工厂实例的工厂方法进行实例化,这里实例了两个对象,所以叫实例工厂
1
2
3
4
5
6
7
8
9
10
11
| <?xml version="1.0" encoding="UTF-8"?>
<beans xmlns="http://www.springframework.org/schema/beans"
xmlns:xsi="http://www.w3.org/2001/XMLSchema-instance"
xsi:schemaLocation="http://www.springframework.org/schema/beans
http://www.springframework.org/schema/beans/spring-beans-4.3.xsd">
<bean id="beanFactory" class="com.itheima.factory.BeanFactory">
</bean>
<bean id="bean3" factory-bean="beanFactory" factory-method="createBean"></bean>
</beans>
|
对比总结
- 构造器实例化简单明了
- 静态工厂也只创建了一个实例对象,注意是静态方法,因为不需要间接创建工厂的实例
- 实例工厂,这种创建了两个实例,目前暂不知道应用,暂时保留意见
Bean的作用域
常用作用域
- singleton 单例
- prototype 原型
SingleTon 单例
默认为SingleTon单例模式
配置文件
1
2
3
4
5
6
7
8
9
10
| <?xml version="1.0" encoding="UTF-8"?>
<beans xmlns="http://www.springframework.org/schema/beans"
xmlns:xsi="http://www.w3.org/2001/XMLSchema-instance"
xsi:schemaLocation="http://www.springframework.org/schema/beans
http://www.springframework.org/schema/beans/spring-beans-4.3.xsd">
<bean id="Scope" class="com.itheima.scope.Scope" scope="singleton">
</bean>
</beans>
|
测试
1
2
3
4
5
6
7
8
9
10
11
| public class InstanceTest4 {
public static void main(String[] args) {
String xmlPath = "com/itheima/scope/applicationContext.xml";
ApplicationContext applicationContext = new ClassPathXmlApplicationContext(xmlPath);
System.out.println(applicationContext.getBean("Scope"));
System.out.println(applicationContext.getBean("Scope"));
}
}
|
这里打印结果是一样的
com.itheima.scope.Scope@6276ae34
com.itheima.scope.Scope@6276ae34
证明只实例了一个,把singleton去掉后,还是一样的,证明默认是正确的
prototype 原型
修改配置文件
1
2
3
4
5
6
7
8
9
10
| ?xml version="1.0" encoding="UTF-8"?>
<beans xmlns="http://www.springframework.org/schema/beans"
xmlns:xsi="http://www.w3.org/2001/XMLSchema-instance"
xsi:schemaLocation="http://www.springframework.org/schema/beans
http://www.springframework.org/schema/beans/spring-beans-4.3.xsd">
<bean id="Scope" class="com.itheima.scope.Scope" scope="prototype"> </bean>
</beans>
|
可以看到实例出来的对象每次都不一样了
com.itheima.scope.Scope@7f560810
com.itheima.scope.Scope@69d9c55
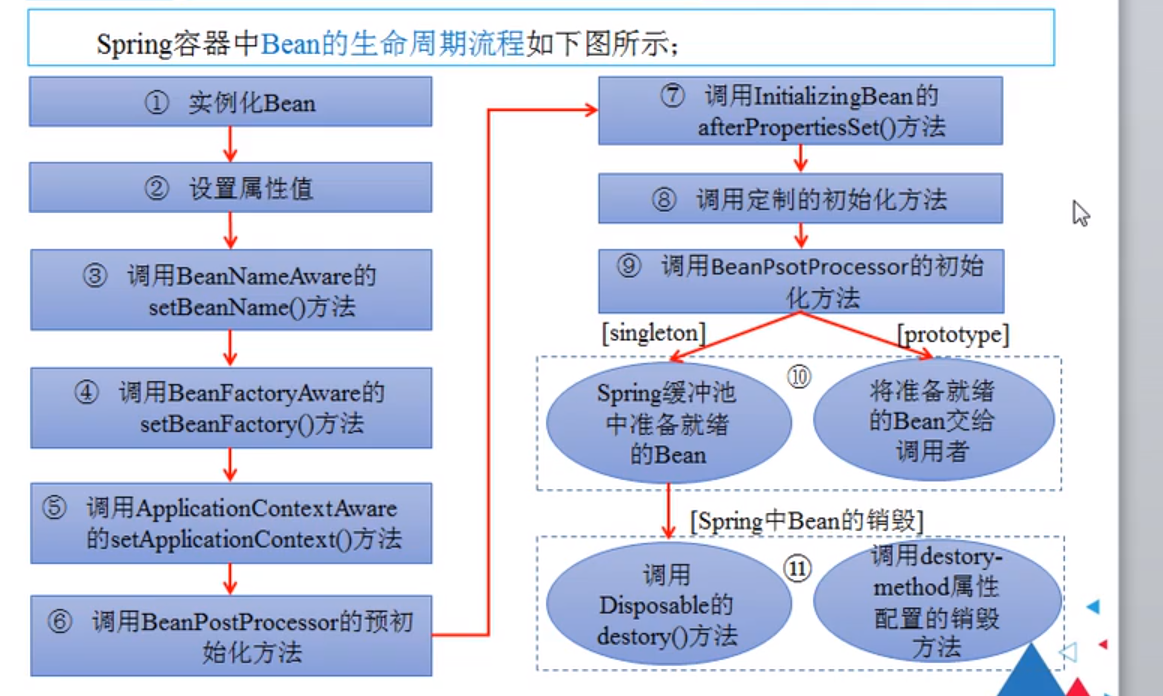
Bean的生命周期
知道其生命周期可以管理其初始化后和销毁前的操作

类似于hook,我们可以在第8个地方注入自己的代码,第11处注入自己代码
Life
1
2
3
4
5
6
7
8
9
10
11
12
| public class Life {
public Life() {
System.out.println("Life Create");
}
public void InitMethod() {
System.out.println("InitMethod");
}
public void DestroyMethod() {
System.out.println("DestroyMethod");
}
}
|
配置文件,这里init-method 和destroy-method就是我们注入的代码处
1
2
3
4
5
6
7
8
9
10
| <?xml version="1.0" encoding="UTF-8"?>
<beans xmlns="http://www.springframework.org/schema/beans"
xmlns:xsi="http://www.w3.org/2001/XMLSchema-instance"
xsi:schemaLocation="http://www.springframework.org/schema/beans
http://www.springframework.org/schema/beans/spring-beans-4.3.xsd">
<bean id="Life" class="com.itheima.life.Life" init-method="InitMethod" destroy-method="DestroyMethod">
</bean>
</beans>
|
测试
1
2
3
4
5
6
7
8
9
| public class LifeTest {
public static void main(String[] args) {
String xmlPath = "com/itheima/life/applicationContext.xml";
ClassPathXmlApplicationContext classPathXmlApplicationContext = new ClassPathXmlApplicationContext(xmlPath);
classPathXmlApplicationContext.close();
}
}
|
结果
1
2
3
| Life Create
InitMethod
DestroyMethod
|
可以看到对象被创建后调用了InitMethod,然后被销毁的时候调用了destroy的方法
这里注意的是不是用的ApllicationContext 而是原生的ClassPathXmlApplicationContext
Bean的装配方式
- 基于xml的装配方式
- 基于Annotation的装配
- 自动装配
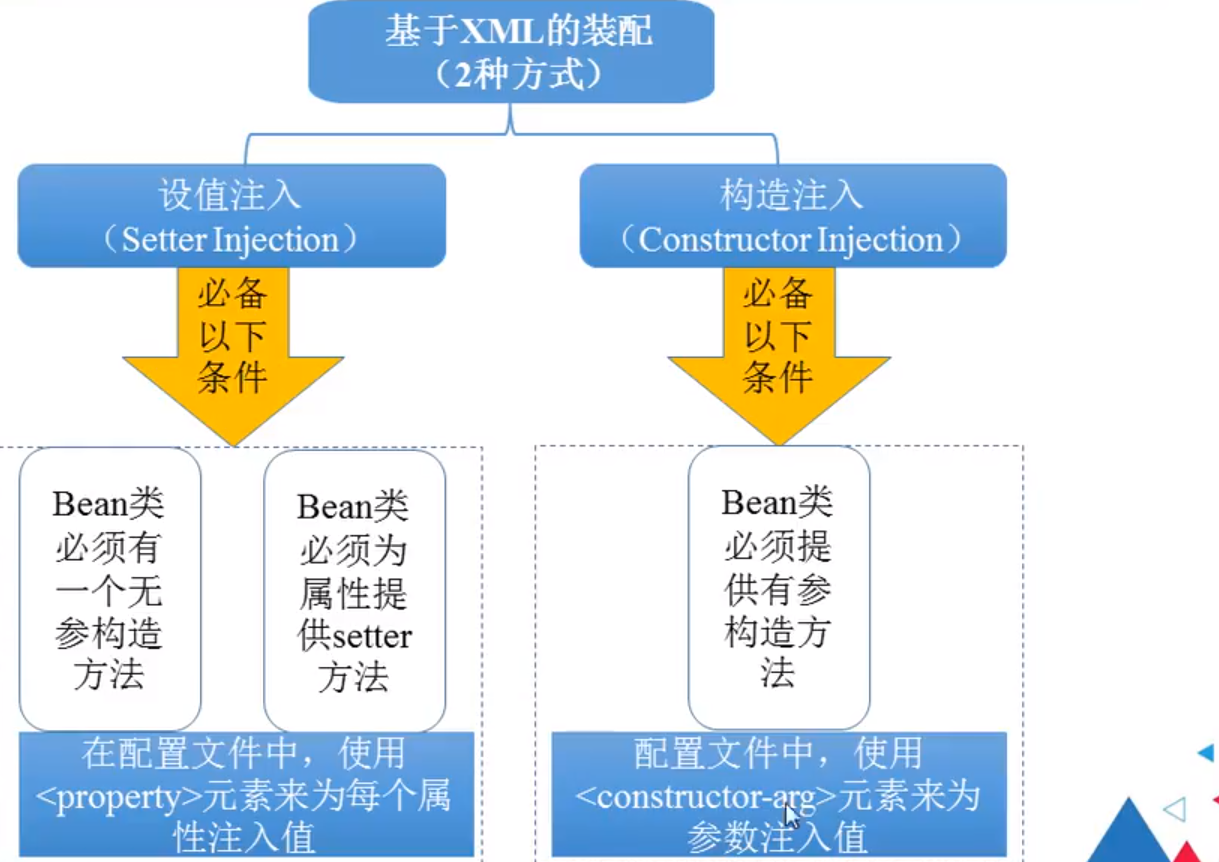
基于xml的装配方式
- 设值注入
- 构造注入

Bean
1
2
3
4
5
6
7
8
9
10
11
12
13
14
15
16
17
18
19
20
21
22
23
24
25
26
27
28
29
30
31
32
33
34
35
| public class Bean {
private String username;
private String password;
private List<String> list;
public Bean(String username, String password, List<String> list) {
super();
this.username = username;
this.password = password;
this.list = list;
}
public Bean() {
super();
}
public void setUsername(String username) {
this.username = username;
}
@Override
public String toString() {
return "Bean [username=" + username + ", password=" + password + ", list=" + list + "]";
}
public void setPassword(String password) {
this.password = password;
}
public void setList(List<String> list) {
this.list = list;
}
}
|
配置文件,bean1 是构造注入,bean2是设值注入
1
2
3
4
5
6
7
8
9
10
11
12
13
14
15
16
17
18
19
20
21
22
23
24
25
26
27
| <?xml version="1.0" encoding="UTF-8"?>
<beans xmlns="http://www.springframework.org/schema/beans"
xmlns:xsi="http://www.w3.org/2001/XMLSchema-instance"
xsi:schemaLocation="http://www.springframework.org/schema/beans
http://www.springframework.org/schema/beans/spring-beans-4.3.xsd">
<bean id="bean1" class="com.itheima.XmlSet.Bean">
<constructor-arg index="0" value="tom" />
<constructor-arg index="1" value="123456" />
<constructor-arg index="2">
<list>
<value>"constructorvalue1"</value>
<value>"constructorvalue2"</value>
</list>
</constructor-arg>
</bean>
<bean id="bean2" class="com.itheima.XmlSet.Bean">
<property name="username" value="张三"></property>
<property name="password" value="654321"></property>
<property name="list">
<list>
<value>"Propertyvalue1"</value>
<value>"Propertyvalue2"</value>
</list>
</property>
</bean>
</beans>
|
测试
1
2
3
4
5
6
7
8
9
10
| public class TestXml {
public static void main(String[] args) {
String xmlPath = "com/itheima/XmlSet/applicationContext.xml";
ApplicationContext applicationContext = new ClassPathXmlApplicationContext(xmlPath);
System.out.println(applicationContext.getBean("bean1"));
System.out.println(applicationContext.getBean("bean2"));
}
}
|
输出
1
2
| Bean [username=tom, password=123456, list=["constructorvalue1", "constructorvalue2"]]
Bean [username=张三, password=654321, list=["Propertyvalue1", "Propertyvalue2"]]
|
基于Annotation的装配
UserDao
1
2
3
4
5
| package com.itheima.annotation;
public interface UserDao {
public void save();
}
|
UserDaoImpl
1
2
3
4
5
6
7
8
9
10
11
12
13
| package com.itheima.annotation;
import org.springframework.stereotype.Repository;
@Repository("userDao")
public class UserDaoImpl implements UserDao {
@Override
public void save() {
System.out.println("UserDao...save...");
}
}
|
UserService
1
2
3
4
5
| package com.itheima.annotation;
public interface UserService {
public void save();
}
|
UserServiceImpl
1
2
3
4
5
6
7
8
9
10
11
12
13
14
15
16
17
18
19
20
21
| package com.itheima.annotation;
import javax.annotation.Resource;
import org.springframework.beans.factory.annotation.Autowired;
import org.springframework.stereotype.Service;
@Service("userService")
public class UserServiceImpl implements UserService {
@Autowired
private UserDao userDao;
@Override
public void save() {
userDao.save();
System.out.println("UserService...save...");
}
}
|
UserController
1
2
3
4
5
6
7
8
9
10
11
12
13
14
15
16
17
18
| package com.itheima.annotation;
import javax.annotation.Resource;
import org.springframework.beans.factory.annotation.Autowired;
import org.springframework.stereotype.Controller;
@Controller("userController")
public class UserController {
@Autowired
private UserService userService;
public void save() {
this.userService.save();
System.out.println("UserController...save...");
}
}
|
配置文件
1
2
3
4
5
6
7
8
9
10
11
12
13
14
15
16
17
| <?xml version="1.0" encoding="UTF-8"?>
<beans xmlns="http://www.springframework.org/schema/beans"
xmlns:context="http://www.springframework.org/schema/context"
xmlns:xsi="http://www.w3.org/2001/XMLSchema-instance"
xsi:schemaLocation="http://www.springframework.org/schema/beans
http://www.springframework.org/schema/beans/spring-beans-4.3.xsd
http://www.springframework.org/schema/context
http://www.springframework.org/schema/context/spring-context-4.3.xsd">
<context:component-scan base-package="com.itheima.annotation" />
</beans>
|
测试
1
2
3
4
5
6
7
8
9
10
11
12
13
14
15
16
17
18
19
| package com.itheima.annotation;
import org.springframework.context.ApplicationContext;
import org.springframework.context.support.ClassPathXmlApplicationContext;
public class AnnotationAssembleTest {
public static void main(String[] args) {
String xmlPath = "com/itheima/annotation/applicationContext.xml";
ApplicationContext applicationContext = new ClassPathXmlApplicationContext(xmlPath);
UserController userController = (UserController) applicationContext.getBean("userController");
userController.save();
}
}
|
相对于第一种,这种比较难理解一些,毕竟多了很多符号,不过仔细想想还是不难的
Resource就是注入的名称,相当于Bean的注入,数据层
Resposity Dao层的Bean
Controller Control层的Bean
Autowired 相当于Resource,自动版本
配置文件的写法,要注意开启context命名空间,
两种写法
- context:annotation-config 同时要定义bean实例
- context:cmpnent-scan 直接扫描包,要添加包名
自动装配
这里只学习byName,其余自行了解
只需在上面的代码中添加Set方法,同时修改配置文件
UserServiceImpl
1
2
3
4
5
6
7
8
9
10
11
12
13
14
15
16
17
18
19
20
21
22
23
24
25
| package com.itheima.annotation;
import javax.annotation.Resource;
import org.springframework.beans.factory.annotation.Autowired;
import org.springframework.stereotype.Service;
@Service("userService")
public class UserServiceImpl implements UserService {
@Autowired
private UserDao userDao;
@Override
public void save() {
userDao.save();
System.out.println("UserService...save...");
}
public void setUserDao(UserDao userDao) {
this.userDao = userDao;
}
}
|
UserController
1
2
3
4
5
6
7
8
9
10
11
12
13
14
15
16
17
18
19
20
21
| package com.itheima.annotation;
import javax.annotation.Resource;
import org.springframework.beans.factory.annotation.Autowired;
import org.springframework.stereotype.Controller;
@Controller("userController")
public class UserController {
public void setUserService(UserService userService) {
this.userService = userService;
}
@Autowired
private UserService userService;
public void save() {
this.userService.save();
System.out.println("UserController...save...");
}
}
|
xml
1
2
3
4
5
| <bean id="userDao" class="com.itheima.annotation.UserDaoImpl"></bean>
<bean id="userService"
class="com.itheima.annotation.UserServiceImpl" autowire="byName"></bean>
<bean id="userController"
class="com.itheima.annotation.UserController" autowire="byName"></bean>
|
总结
最常用的是注解的方式也就是第二种,重点学习
本文作者:NoOne
本文地址: https://noonegroup.xyz/posts/f371be85/
版权声明:转载请注明出处!

